
Why Digiscoping Changes the Game
Quickly learn how to attach your phone to binoculars for crisp DIGISCOPING photos and videos—no expensive gear required. This six-step guide shows simple, reliable techniques to center, secure, focus, and troubleshoot so you capture sharper wildlife and distant subjects now.
What you'll need
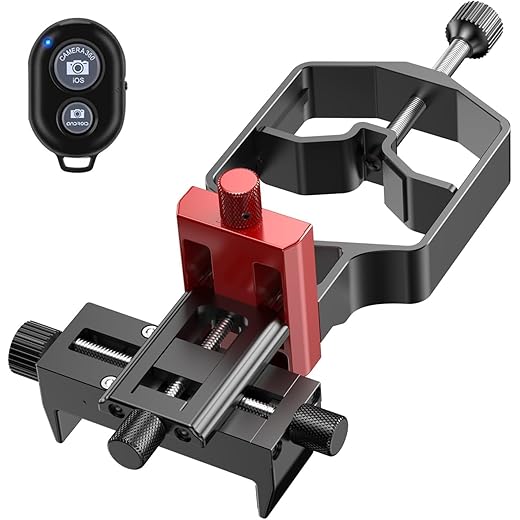
Novagrade Double-Gripper Phone Digiscoping Adapter: Quick Overview
Decide: Buy an Adapter or Build a DIY Mount
Adapter or duct tape? The surprising pros and cons of each—spoiler: both can work brilliantly.Compare commercial phone-to-eyepiece adapters (stable, quick to attach, often adjustable) with DIY solutions (cheap, customizable). Choose the route that fits your budget and patience.
Check compatibility before you buy or build:
Read reviews for stability and user photos, and confirm the seller’s return policy if alignment fails. If DIY, choose sturdy materials (aluminum bracket, 3D-printed parts, or hardwood) and add soft pads (felt, silicone) to avoid scratching optics.

Prepare Your Phone and Binoculars
Want sharper images? How a 2-minute setup beats blind luck in the field.Clean both camera lens and eyepiece glass. Use a microfiber cloth, lens pen, or a blast of canned air to remove dust and smudges — dirty optics ruin alignment and contrast.
Remove bulky phone cases. Take off thick OtterBox-style covers so the adapter sits flush; test the phone naked or with a thin TPU case.
Mount your phone on a stable surface to estimate height and alignment. Prop it on a stack of books or a tripod plate to preview camera-to-eyepiece placement.
Set your phone camera to the highest quality and adjust these settings:
Ensure the binocular diopter is adjusted to your eye by covering one objective or closing one eye and focusing the other eyepiece until the image is razor-sharp.
Center the Camera Over the Eyepiece
Think of it as laser-like precision: small shifts = big improvements in image clarity.Place the binoculars on a tripod or steady surface, then hold your phone over the eyepiece and open camera live view. Move the phone slowly until you see the circular image (the exit pupil) fill the frame.
Move deliberately—tiny shifts matter. If you see dark edges (vignetting), pull the phone back a few millimeters; if the image looks tiny, move it closer. For example, when I first tried digiscoping a gull, a 2 mm slide to the left removed a crescent of shadow and centered the bird.
Secure the Connection for Stability
No more shaky, unusable shots—simple fixes that make your setup as steady as a tripod.Secure the adapter or mount firmly to eliminate wobble. If using an adapter, tighten clamps per the manufacturer instructions and confirm the phone lens sits perfectly centered over the eyepiece.
Pad contact points and fasten the phone to the binoculars. For DIY setups, wrap elastic bands, use Velcro straps, and add soft foam or a folded lens cloth at metal/plastic contact points to prevent scratches and slipping. For example, tuck a microfiber cloth where the phone frame meets the binocular barrel.
Test by gently tapping—if image shifts, tighten and re-pad.

Fine-Tune Camera and Binocular Focus
Manual settings are your secret weapon—ditch auto for startlingly clear results.Use manual or tap-to-focus to lock sharpness on distant subjects. Tap the bird’s eye or the tip of a sailboat mast on your phone screen to force the camera to focus where you want it.
Lower ISO to reduce noise—set ISO to 100–400 when light allows. Increase shutter speed to cut motion blur—aim for 1/500s or faster for handheld shots of birds in flight.
Adjust exposure/EV down slightly (‑0.3 to ‑1) to protect highlights from blowing out. Switch to your phone’s Pro/Manual mode or call up the telephoto module if available to fine-tune focus and focal length.

Take Test Shots and Troubleshoot Common Issues
Vignetting, reflections, blur? Quick fixes that save the day—and your photos.Shoot a series of test images—try a distant tree, a rooftop, then a perched bird—to evaluate framing and sharpness. Check each frame for vignetting, ghosting, or image shift.
Check for dark edges (vignetting): increase eye-relief distance by sliding the phone slightly back from the eyepiece until the circle fills the frame.
Check for reflections or glare: shade the eyepiece with your hand, a small rubber hood, or a folded cloth; try angling the phone a few degrees.
Check for ghosting: wipe lenses, reduce screen brightness, or introduce a tiny offset to the camera axis.
Use a remote shutter, timer, or burst mode to raise your hit rate—especially for moving subjects.
Review and tweak attachment, alignment, and settings until satisfied.

Ready, Set, Shoot!
With the attachment secure and settings dialed in, you’re ready to capture sharp digiscoping photos; practice, tweak, and enjoy surprising results—will you explore new wildlife perspectives, refine your technique with patience, curiosity, and creativity, and proudly share what you discover?


OMG this made my Saturday! 😍
I used an adapter and legit felt like a wildlife photographer for 5 minutes before my dog photobombed the frame haha.
Couple of tiny things the article didn’t mention:
– Turn off digital zoom when aligning — move the phone physically instead.
– Consider using a remote shutter or self-timer so you don’t wiggle the phone when pressing the screen.
Thanks for the clear steps!
Also try the volume button on wired earbuds as a shutter — cheap hack that works on many phones.
Remote shutter is clutch. Bluetooth remotes are cheap and way easier than using the timer all the time.
Zara — omg yes that earbuds trick! I forgot about that. Saved me a bunch of blurry pics.
Love the dog photobomb — that’s the best kind of wildlife 😂 And great tips: physical movement > digital zoom, and remote shutter/self-timer reduces shake.
Also, clean your phone lens w/ a microfiber before you start. Found a smudge in the middle once and wasted 20 mins 😂
This guide was super helpful — especially the ‘Center the Camera Over the Eyepiece’ step.
I never realized how small misalignment ruins the shot. Followed the adapter vs DIY section and went DIY (cheap clamp + foam) and got decent results.
Couple questions: any tips for keeping the phone from slipping after 30–40 minutes? Also, is silicone tape ok or will it scratch the eyepiece?
I’ve had silicone leave a faint mark on cheap eyepieces. If you can, use a microfiber layer between the eyepiece and the silicone.
Non-slip pads saved me — the kind used under rugs. Also wrap a hair elastic around the whole setup for backup. 🙂
Glad it helped, Sarah! For slippage try adding a thin strip of non-slip drawer liner between the phone and adapter. Silicone tape is usually safe but use a thin piece — it can leave residue over long periods. Clean with isopropyl afterward.
Ran into an annoying issue: when I tightened everything for stability (step 4), the phone camera auto-focused on the binocular glass reflection and produced blurs.
I switched to a manual camera app and locked exposure/focus — that fixed it. Sharing in case others hit this.
Thanks @Ava, hadn’t thought of ND filters — will try next time.
Good troubleshooting, Daniel. Locking focus/exposure or using a dedicated camera app often fixes those reflection autofocus problems. Also try angling slightly to avoid direct reflections.
I had the same! Using a neutral density filter (if you have one) helped reduce glare. Otherwise, tweak the angle like admin said.
Question: does removing the phone case always help? I worry about scratching the phone against the adapter.
Also is there a recommended adapter brand for beginners?
Removing the case usually helps with alignment and stability. If you prefer to keep a case, a thin one is better than a bulky one. For brands, Spotting Scope Co. (example) and Gosky are popular beginner-friendly adapters — but plenty of generic models work fine. Always add a microfiber layer to prevent scratches.
I kept my slim case and used a small foam pad as a buffer. No scratches so far, YMMV.
Long post: Tried this over the weekend. Followed 1->6 exactly.
– Step 1: Went DIY since adapters were pricey.
– Step 2: Removed case, cleaned lens with a blower + microfiber.
– Step 3: Used a small LED flashlight to help center the camera — reflected light helped find the center.
– Step 4: Secured with velcro straps and one clothespin for backup — ridiculous but worked.
– Step 5: Used manual focus on my phone app and adjusted binocular diopter first.
– Step 6: Took 30 tests; finally got a crisp shot of a heron at 80m.
If you’re patient, you can make this work without spending a ton.
Owen: a little vignetting at first but adjusting the camera crop and moving the phone slightly fixed most of it.
For vignetting, slightly increase the distance or use a different crop ratio. Also some phone cameras have lens correction settings that help.
Great detailed breakdown, Priya — the flashlight trick is a neat idea for centering! Thanks for sharing your workflow.
Clothespin hack = chef’s kiss 😂 I love DIY creativity. Did you notice any vignetting? I get dark edges with some setups.
Nice guide overall — concise and practical. A couple suggestions for future updates:
1) Add a quick reference checklist for gear and settings (so you don’t forget the tiny things).
2) Include a short troubleshooting table for common issues in step 6 (blurry, vignetting, reflections).
Would make it even more newbie-friendly.
Noted — printable quick sheet coming soon.
Yes please add a checklist. I always forget the diopter adjustment and then curse myself later.
Thanks @Tom — the diopter trick is easy to miss. Also maybe include a one-page printable sheet for field use.
Fantastic suggestions, Grace. A checklist and a troubleshooting table are great ideas — I’ll add them to the next revision. Thanks!
Bought an adapter and still couldn’t center the lens. Felt like I needed a PhD in micro-adjustments 😂
Step 3 is deceptively hard.
If your adapter has adjustable clamps, loosen everything and start from scratch, aligning by eye first. Patience = less cursing.
Trust me — you’re not alone. Try using a small piece of paper with a hole punched to help align the phone camera to the eyepiece. Do coarse alignment first, then fine-tune with test shots (step 6).
Quick note: if you’re using a binocular with big eyecups, fold them down (if possible) before mounting. Makes centering way easier.
Otherwise the phone sits at an angle and you get all sorts of dark corners.
Agree — my cheap bino’s rubber folds in weird ways tho. I ended up trimming a tiny bit of rubber (carefully) to make a flatter surface.
Good tip, Ethan. Folding or removing eyecups can reduce obstructions and improve alignment — just be gentle with the eyecups so you don’t damage them.
Tried the ‘Ready, Set, Shoot!’ and my cat immediately stared into the lens and ruined the focus 🙄
Anyway, fun project. DIY mount + patience = surprisingly decent pics. Might upgrade to a proper adapter later.
Lol cats. If you upgrade, look for adapters with micro-adjust knobs — they save SO much time when centering.
Cats always know when you’re trying to be productive. Glad it worked out otherwise — upgrading to a proper adapter usually simplifies setup, but DIY is great to learn the basics.