Pocket Power: Why Compact Action Cameras Matter for Adventure Optics
Compact action cameras are indispensable tools for adventure optics. Small, tough, and portable, they let you document extreme sports, backcountry scouting, and fast-moving field work without bulky gear. Their design balances durability with capable imaging for unpredictable environments.
This guide shows you the key optical and practical features to look for. You will learn how to optimize image quality in low light, moving scenes, and harsh weather. Plus concise tips for choosing the right camera, mounts, filters, and power solutions.


The Ultimate Adventure Camera: Insta360 Go Ultra
Understanding the Compact Action Camera: Form Factor and Imaging Trade-offs
What “compact” really means
Compact action cameras squeeze durability and useful optics into a pocketable shell. That size saves weight and hassle on long treks, but it forces compromises: smaller bodies usually house smaller sensors, fixed wide lenses, and limited heat dissipation—each affecting image quality.
Sensors, processors, and real-world performance
Most pocket action cams use tiny 1/2.3″ to 1/1.7″ sensors (some newer models push slightly larger stacks). Smaller sensors gather less light, raising noise at high ISO and narrowing dynamic range. A fast, modern image processor (e.g., from Sony or Ambarella in flagship models) helps reduce noise, enable higher frame rates, and power onboard HDR algorithms—crucial for contrasty mountain scenes.
Lenses and depth-of-field
Pocket designs favor wide-angle, fixed lenses to capture action and keep focus simple. The upside: dramatic context and forgiving focus. The downside: exaggerated perspective and limited background separation (shallow DoF is rare). Expect barrel distortion and strong FOV—good for biking, less ideal for tight portraits.
Software matters
Smart denoising, multi-frame HDR, and electronic stabilization are the gap-fillers between tiny hardware and usable footage. Prioritize cameras with robust firmware updates and RAW or flat-log profiles if you plan serious color grading.
Quick tip: if you shoot low-light or need better DR, favor slightly larger-sensor models or ones with proven HDR and noise management—details we’ll unpack in the optics section next.
Optics Essentials: Lens Characteristics, Field of View, and Filters
Field of view and focal-length equivalents
Action cams favor very wide FOVs (equivalent ~14–24mm on full-frame) to capture context and reduce missed moments. That dramatic perspective is great for helmets or surf shots, but compresses distant subjects—so step closer for portraits or switch to a narrower mount (DJI Action 2 with an optional wide-to-standard adapter is a good example).
Aperture and depth of field
Most pocket cams use small, fixed apertures to keep nearly everything in focus—handy for fast action but limiting in low light and for creative blur. To control exposure without changing aperture, rely on ND filters, ISO control, and frame-rate/shutter adjustments.
Distortion: when to embrace or correct
Wide lenses create barrel or fisheye distortion. Embrace it for immersive POVs and fast sports shots. Correct it for architecture, horizons, or professional edits—most editors (Lightroom, GoPro Quik) have built-in lens profiles to remove fisheye artifacts.
Filters and accessory optics
Screw-on or magnetic filters (polarizers and ND) are game-changers: polarizers cut reflections on water and foliage; ND filters let you keep natural motion blur in bright sun (follow the 180° shutter rule: shutter ≈2× frame rate).
Choosing optics that preserve detail
Pick cameras with sharp native glass (GoPro HERO12, Insta360 X3) and test for corner softness and chromatic aberration. If you add adapters or filters, inspect for vignetting and focus fall-off in real shooting conditions before committing to a mount.
Stabilization and Mounting: Keeping Shots Steady on the Move
Stabilization technologies: what to expect
Electronic stabilization (GoPro HyperSmooth, Insta360 FlowState) uses gyro + software to smooth shake. Advantage: no extra gear; limits: heavy cropping, unnatural warble in extreme motion. Sensor-shift / in-body stabilization reduces crop and preserves framing but is rare in tiny action bodies. Mechanical gimbals (small two- or three-axis units from Feiyu, Moza, Gudsen) give the most natural motion but add weight and bulk — choose gimbals sized for action-cam payloads.
How stabilization interacts with wide FOV and cropping
Wide FOV gives EIS “room” to crop when stabilizing; that’s why horizon correction works well on action cams. But aggressive digital stabilization can reduce effective resolution and exaggerate rolling artifacts during rapid jolts. If you need full-resolution wide shots, favor mechanical gimbals or minimal EIS.
Mounting systems: quick guide
Practical tips
Next, we’ll turn these stabilized scenes into compelling footage by dialing in resolution, frame rates, and color controls.
Image and Video Settings: Resolution, Frame Rates, and Color Control
Resolution & frame rates: pick for purpose
Choose 4K for future-proofing and cropping; 2.7K or 1440p often gives a sweet spot of file size vs detail; 1080p maximizes battery and card time. For fast action (mountain biking, surfing) favor higher frame rates: 60fps for smooth motion, 120fps+ for slo-mo. Example: for a fast downhill run, 2.7K/60 or 4K/30 balances sharpness with usable slow motion.
Bitrate & codecs: why they matter
Higher bitrates and modern codecs (H.265/HEVC) preserve detail and grading latitude; H.264 is more compatible but less efficient. If you plan heavy editing or stabilization, shoot at the camera’s highest bitrate and avoid aggressive EIS modes that crop and discard pixels.

Color profiles & white balance
Use flat/log profiles (GoPro Protune, DJI D-Cinelike) when you’ll color-grade—these retain highlights and shadow detail. In mixed lighting, lock white balance or set Kelvin manually (3500–6500K) and carry a small gray card to avoid green/blue casts.
Exposure control & practical workflow
Follow the 180° shutter rule (shutter ≈ 2× frame rate) for natural motion blur; increase shutter only for crisp frames. Prefer manual exposure or shutter priority and cap ISO to avoid noise (native sensor limits matter). In the field, prioritize lowest ISO, flat profile, and higher bitrate. In post, start with noise reduction, then stabilize, then apply color grading/LUTs—preserve highlights and avoid over-sharpening to keep optical fidelity.
Ruggedness, Weatherproofing, and Power Management in the Field
Built to survive: waterproof, dust, and shock ratings
Look for real-world ratings: IPX7/IPX8 and IP6x (dust) specs matter. Cameras like the GoPro HERO11 Black or DJI Action 3 offer native waterproofing to 10–15m; otherwise a rated underwater housing (or Pelican case for storage) is essential for deeper dives or harsh grit. Shock tolerance is often implied by MIL‑STD ratings — expect survivability from drops of 1–2 meters with rugged housings.
Protective housings and lens protection
Opt for low-reflectance, optically coated cover glass or replacement domes for underwater work to preserve edge-to-edge sharpness. Anti-fog inserts and silicone O‑ring spares are cheap insurance when you’re shooting surf or spelunking.

Power strategies for long trips
Typical 4K shooting: ~60–90 minutes per battery; plan 2–4 spares. Use USB‑C PD power banks (10,000–20,000 mAh) for field charging and keep one bank dedicated to camera gear. Practical tips:
Maintenance: optics, condensation, and storage
Clean lenses with a microfiber cloth or lens pen; blow off sand first. To prevent fogging, acclimatize gear in a sealed bag when moving from cold to warm and use silica gel in your kit box. Store cameras dry in a padded case with desiccants between outings.
Next, we’ll translate these durability and power lessons into practical buying criteria and field techniques.
Choosing and Using Your Pocket Action Camera: Buying Criteria and Field Techniques
Decision framework by activity
Match the camera to how you move:
Practical purchase checklist
Field techniques & best practices
Armed with these choices and techniques, proceed to the Conclusion to tie pocket power into your overall adventure workflow.
Making Pocket Power Work for Your Adventures
Understand optical and sensor trade-offs—wide lenses and small sensors favor portability but need careful exposure and framing. Prioritize stabilization and ruggedness, and plan power management with spare batteries and protective cases. Set resolution, frame rates, and color profiles to suit the scene, and use mounts and filters to extend capability.
Match features to your adventure priorities, then experiment with angles, mounts, and settings to get the most from your pocket action camera today.


Curious if anyone’s compared the AKASO EK7000 to the i3 Thumb-Sized 4K. Looks like EK7000 is bulkier but maybe more battery and housing options? Thoughts? I’m leaning toward AKASO for waterproof reliability but the i3 looks so pocketable.
I own both. EK7000 for kayaking and longer shoots; i3 for quick trail clips. If you only want one camera, go AKASO for reliability. If you want the convenience of something that disappears in your pocket, i3.
AKASO EK7000 is a solid budget waterproof option with a dedicated housing and more physical camera controls; good battery life and accessory ecosystem. The i3 is excellent for ultra portability and quick clip-on POVs but may sacrifice battery and manual control. If you prioritize rugged water use and longer sessions, AKASO is a safer bet.
Heads up — EK7000 can sometimes have rolling shutter on fast panning. Not a dealbreaker but note for action-heavy shooters.
Also factor in accessory kits: EK7000 tends to have broader mount kits available, while i3 often relies on small clip mounts. If you’re going to use the TELESIN filters, double-check adapter compatibility.
Long rant incoming — hope that’s cool.
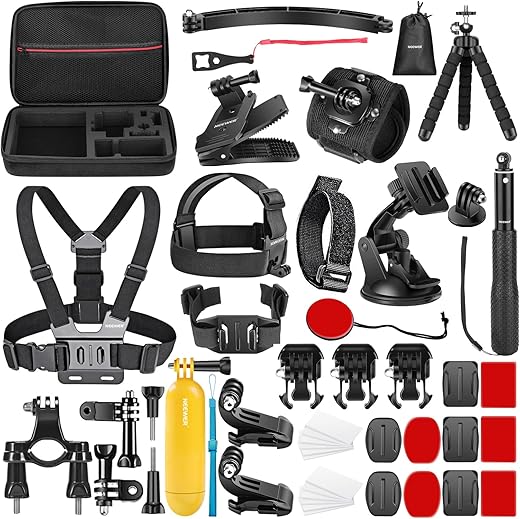
I bought cheap mounts for a weekend trip and learned the hard way: adhesives don’t love salt water, clips hate sweat, and batteries are liars on long days. The article’s ruggedness/power section saved me on the last trip; I picked up the Neewer 50-in-1 Universal Action Camera Accessory Kit and the 3-Pack 1350mAh batteries. The kit has saved me more times than I can count — extra suction cups, straps, etc. BUT also, test EVERYTHING before you leave home. I ruined a sunrise shot because I thought the adhesive had cured overnight. Lesson: test gear in a controlled setting first.
Love the long-format feedback, Tom. Agree on testing: adhesives, clamping, and battery cycles should be field-tested. The Neewer kit is great for redundancy.
100% — also re: salt water, rinse mounts in fresh water and let them dry. Adhesive can be revived sometimes with isopropyl clean of the surface before reapplying.
Small practical tip: when using ND filters (like the TELESIN set), switch to higher frame rates only when you have enough light or you’ll end up with underexposed clips. The article’s section on image and video settings nailed that balance between shutter, frame rate, and ND usage.
Good technical note, Owen — the exposure triangle plays with ND filters, so you either need more light or slower shutter (or higher ISO, with noise penalty). Glad that section was useful.
Also set white balance manually when using filters — auto WB can freak out and shift colors between clips.
Positive take: pocket cams make creativity easier. I use an AKASO EK7000 for underwater reef dives and the little rig fits everywhere. The only gripe is the UI — changing settings in the field can be clumsy. Article’s note about practicing menu changes before the trip is gold. Also — anyone else still confuse ‘frame rate’ and ‘shutter speed’ on first goes? 😂
UI is such a pain. I set custom presets where possible so I can jump between 30/60/120 quickly.
You’re not alone, Ben — it’s a common confusion. Frame rate is frames captured per second; shutter speed controls motion blur per frame (ideally shutter ≈ 1/(2*frame rate) for natural motion). Practicing menus makes switching profiles on the fly much smoother.
I appreciated the trade-offs section — made me actually think before buying. Short comment: don’t expect DSLR-level color control. Compact sensors, small lenses = compromises. But for travel and adventure, they’re perfect. 🙂
Exactly — the piece tries to frame those compromises so people pick the right tool. Post-processing and a good flat/color profile help a lot if you’re serious about color grading later.
Yep. Shoot in flat/profile if you want grading flexibility. Also invest in filters and ND if you plan on bright outdoor shoots.
Minor note — some of the newer pocket cams do surprisingly good dynamic range for their size. Not DSLR, but getting closer every year.
Great deep-dive — I loved the parts about stabilization and mounting. I’ve been using an AKASO EK7000 for a couple of years and the image looks fine for quick hikes, but the battery life kills me on cold mornings. The bit about carrying spare 3-Pack 1350mAh batteries was clutch.
Question: anyone tried the i3 Thumb-Sized 4K with a chest mount vs helmet mount for biking? Looking for steady POV without wobble.
Thanks, Laura — glad the battery section was helpful. For biking, helmet mounts typically give less bobble than chest mounts for head movements, but chest can feel more immersive. If you’re worried about wobble, pair a solid helmet mount (like the 12-in-1 Helmet Adhesive Mount) with a short arm and consider a gimbal-style stabilizer or electronic stabilization in-camera.
I’ve used an i3 on my helmet and chest. Helmet = more stable for high-speed rides, chest = better for hands-free shots and showing handlebars. Also, try the Neewer 50-in-1 kit for mounting bits — saved me when a clip failed once.
If battery life is the big issue, keeping one of the 3-Pack batteries in an inner pocket helps in winter — warm batteries perform way better. Also tilting the camera slightly down on the helmet cut down on wind noise for me.
Technical curiosity: anyone tried using CPL + ND together on these tiny sensors and seen weird color casts? I got a magenta cast using the TELESIN combo on my AKASO and had to correct a lot in post. Wondering if it’s the filters or the camera profile.
I saw that too — one of my TELESIN CPLs had a slight cast. Exchanging the filter fixed it. Buy from sellers with good return policies.
If you shoot flat profile and then grade, small casts are easier to neutralize. But yeah, annoying to deal with in the field.
Color casts can come from cheaper filter coatings interacting with the sensor/white balance. Try setting a manual WB in-camera and test each filter alone to isolate the issue. If it’s consistent across filters, likely camera profile; if only with certain filters, there may be a coating imbalance.
Loved the lens and filter section. Never thought about CPL for action cameras until now. Bought the TELESIN 4-Pack CPL and ND Filter Kit after reading this — huge difference on sunny lake days. Colors pop and the water glare is reduced.
Agreed. I had to dial back to a narrower FOV on my AKASO once I started using ND/CPL together. Otherwise the corners looked funky.
Awesome — CPLs are underrated for action cams. Just watch for vignetting if you stack filters or use a super wide FOV. The article mentions trade-offs: sometimes less wide-angle can reduce edge artifacts when using filters.
Haha the bit about ‘expect compromises’ cracked me up because I once tried to mount a pocket cam like a RED camera and was disappointed. 😂 For anyone expecting cinema-level stabilization, either pay big bucks or learn to stabilize in post. The Neewer kit + TELESIN filters + some editing saved my last clip though.
Amen. Pocket action cameras are for accessible, lightweight capture — not a substitute for cinema rigs. But with good accessories and editing, you can punch above the form factor.
Preach. Also, fast cuts and creative angles go a long way to hide imperfections 😉
Quick, practical nitpick: the section on clip-style cameras should stress clip security more. I almost lost an i3 Thumb-Sized 4K action camera from a backpack strap because the clip wasn’t fully latched. Maybe mention double-checking and using a safety tether? 😬
Great point, Samir — safety tethering and redundant attachment are good field practices. I added notes about checking clips and using adhesive mounts as backups in the buying criteria section.
Also, clip-style cams are fab for convenience but not for extreme ruggedness. For river runs I’d go with a helmet or adhesive mount + tether.
Yep. I wrap a short bungee cable through the clip on sketchy runs. Embarrassing to admit, but saved the camera once when the clip unclipped itself.
Friendly PSA: clip cams look great for ‘casual’ shots, but if you’re doing any climbing or can fall, use the 12-in-1 Helmet Adhesive Mount and a tether. I saw someone lose a whole day of footage when their clip flipped off a strap. Also, the Neewer kit’s different screws and pads are lifesavers when you need a weird angle.
Solid PSA. The article emphasizes redundancy for that reason — adhesive mounts + tethers + backups in your Neewer kit can prevent heartbreak.
The 12-in-1 kit is pretty versatile — saved me during a canyon scramble when I needed a low-to-ground POV.
Safety first. I carry an extra 12-in-1 buckle kit specifically for long treks. Mount failure is a real thing.
Short note: the article’s buying criteria helped me choose accessories rather than a new camera. Ended up with the Neewer 50-in-1 kit, TELESIN filters, and a 12-in-1 helmet mount. My compact action camera setup is now annoyingly versatile lol. A couple typos in the optics section but overall super useful 🙌
Also, don’t forget spare adhesives if you’re relying on helmet or board mounts. Adhesive degradation is real.
Thanks for the heads-up on typos — I’ll review that section. Happy the accessory route worked for you; often that’s the most cost-effective upgrade.
Accessories > camera, most of the time. You can squeeze so much more out of an existing sensor with the right mounts and filters.