
Bring Tiny Wonders Home: Why Budget Microscopes Belong in Homeschool Science
Budget microscopes open doors to hands-on discovery and everyday science. They let children explore tiny worlds without a big investment. These simple tools spark curiosity, build observation skills, and teach scientific thinking.
Low-cost microscopes are best for beginners, younger students, and projects where portability matters. Expect magnification good for plant cells, insects, and simple slides—not professional research. With guidance and creative activities, they become powerful teaching aids.
This guide shows practical choices, upgrades, and lesson ideas to make microscope time fun and educational. Start exploring small worlds today with confidence.


Budget-Friendly Microscopes: Make Science Fun for Kids
Why Microscopes Matter in Homeschool Science
Build observation and scientific-thinking skills
A microscope trains kids to look closely, notice patterns, and ask better questions. Start simple: observe an onion skin or a grain of sand, sketch what you see, then ask “Why?” and design a quick test. Tip: begin at low magnification, move slowly, and keep a lab notebook — those habits are the backbone of the scientific method and translate to any subject.
Cross-curricular curiosity: art, journaling, and history
Microscopy naturally blends science with art and language. Students can create scientific watercolors of diatoms, keep illustrated field journals, or read short biographies of early microscopists like Hooke and Leeuwenhoek to link history with hands-on observation.
Age-appropriate learning outcomes
Confidence, tactile learning, and long-term projects
Handling slides and specimens is tactile and empowering; kids gain practical skills (pipetting, focusing, preparing wet mounts) that boost confidence. Microscopes invite multi-week projects — pond ecosystem monitoring, mold growth experiments, or a “micrograph” portfolio — that teach patience and record-keeping. Invite siblings or parents to co-observe; family discussions often lead to richer hypotheses and sustained interest.
Next up: practical guidance on choosing a budget microscope — the features that really matter for homeschool use and how to match them to your child’s goals.
How to Choose a Budget Microscope: Features That Matter
Pick the right type
Choose the form that matches your goals. Compound microscopes (40–400x) are best for cells and prepared slides. Stereo/dissecting microscopes (10–50x) are ideal for insects, leaves, and 3D viewing. Digital/USB models trade optics for convenience — great for sharing images on a tablet or recording observations.
Magnification that makes sense
Optics and illumination
Prefer glass lenses and multi-coated optics when possible — they cut glare and sharpen contrast. Illumination: simple mirror or LED will do; LED is stable and battery-friendly. A condenser and adjustable diaphragm improve contrast for cell work.
Build, ergonomics, and accessories
Look for:
Power, portability, warranty, and buying used
Battery/USB power boosts outdoor use; mains is fine for a home lab. Check warranty/support for replacement parts. Buying used? Inspect for missing parts, clean optics (no haze/fungus), working condenser/diaphragm, smooth stage movement, and functioning light. Ask for test images or try before buying.
Next up: compare affordable microscope types and practical pros & cons to match models to age and projects.
Affordable Microscope Types and Practical Pros & Cons
Entry-level student compound microscopes
A staple for cell biology lessons — typically 40–400x with 3–4 objective lenses, LED light, and metal frame.
Simple stereo / dissecting scopes
Low magnification (10–50x), binocular view for three-dimensional objects.
USB / digital microscopes
Camera-based units that plug into a computer or tablet; magnification claims vary.
Smartphone clip-on adapters
Clip or jig attaches phone camera to an eyepiece for photos and video.
Toy microscopes and beginner kits
Designed for young children with simple magnifiers and colorful slides.
Next, we’ll look at budget microscope kits and simple DIY upgrades to boost performance without breaking the bank.
Budget Microscope Kits and DIY Upgrades to Boost Performance
What to look for in affordable kits
Good starter kits accelerate learning by bundling essentials and experiments. Look for:
Quick, low-cost upgrades that make a big difference
Small add-ons often outperform spending on a new scope.
DIY slide-making: safe, simple specimens
Hands-on slide prep builds skills and thrills kids.
Maintenance, storage, and repair tips
Extend life without replacing the whole unit.
Practical Activities, Lesson Ideas, and Project Plans for Homeschoolers
Starter exploration sessions (30–45 minutes)
Quick, curiosity-sparking exercises to begin:

Step-by-step simple labs (45–60 minutes)
Onion cell: peel thin epidermis, mount in water, add iodine, observe cell walls and nuclei.
Leaf stomata: press nail polish on leaf underside, let dry, peel and mount to view stomata pattern.
Hair vs. fiber: mount human hair and a synthetic fiber, compare medulla and surface texture under low and high power.
Mini research projects (2–4 weeks)
Microhabitat survey: sample soil, leaf litter, pond; count and categorize microorganisms weekly.
Mold growth observation: inoculate bread in sealed Petri dishes, record colony growth and conditions (light, humidity).
Cross-curricular builds
Sample 4–6 week unit (objectives, materials, assessment)
Objectives: observe cells, practice slide prep, record data, communicate findings.
Materials (low-cost): glass slides & cover slips, pipettes, iodine, methylene blue, tweezers, Petri dishes, onion, leaves, bread, ruler, smartphone adapter.
Assessment options:
Extensions & differentiation
Older students: measure cell size with a stage micrometer, try basic staining protocols, join citizen science (iNaturalist photos).
Keep kids engaged by varying tasks, offering choice, and scaling complexity—turn descriptive notes into quantitative counts for older learners.
Next, tie these hands-on experiences into long-term learning and sustainability in homeschooling.
Start Small, Observe Big: Making Microscopy a Sustainable Part of Homeschooling
Inexpensive microscopes and kits deliver scientific learning, spark curiosity, and build skills over time. Focus on ease of use, steady light and clear optics, and few simple upgrades rather than chasing top specs. Start with projects — gardens, pond life, household materials — to make observation habitual and fun.
Treat microscopy as an adaptable tool in your homeschool toolkit: rotate short investigations, scale complexity as kids grow, and celebrate small discoveries. With consistency and creativity, tools yield big learning.

This was a helpful read but felt a bit light on safety tips. Microscope slides and live samples can be messy — I’d love a short safety checklist for homeschooling parents (handling stains, sharps, disposal).
The lesson ideas section was gold. We did the ‘start small, observe big’ pond water activity and the kids found loads of critters. One edit suggestion: add estimated prep/time per activity — saves planning headspace.
Yes! Even ‘5-min setup’ vs ’30-min lab’ would help. My oldest likes planning like a project manager 😂
Great suggestion, Priya — adding prep times would be helpful. We’ll consider including a quick ‘time to set up’ estimate for each activity in a follow-up.
I appreciate the ‘How to Choose a Budget Microscope’ checklist in the article. One thing I’d add: consider future-proofing — if your kids get into biology, invest in decent objective lenses now to avoid rebuying later.
Also, anyone else get annoyed at product listings that promise insane magnifications? 2000x doesn’t mean good image 😂
Good point, Joanna — magnification without resolution isn’t helpful. The article tried to emphasize optical quality (aperture, lens type) over just ‘X’ numbers. Thanks for calling that out!
Totally. My kid got obsessed with ‘max magnification’ and then complained about fuzzy blobs. We learned to look for real specs like objective numerical aperture.
Pro tip: try the Smartphone Microscope Adapter for quick kids’ pic-sharing. Not perfect but fun and keeps them engaged.
Haha yep. Marketing math is wild. Better to show compared images imo.
A mild critique: the product list skews a bit Amazon-heavy — which is fine for accessibility, but maybe include local suppliers or used lab equipment tips next time. There are great secondhand microscopes out there if you know what to inspect.
Local community colleges sometimes upgrade and sell older scopes cheap. Worth asking.
Secondhand can be a gem — I scored a really nice monocular scope at a thrift auction. Just test optics and focus mechanism before buying!
Good point, Ben. We focused on widely available options for ease, but including local/used equipment tips is a great idea for future pieces.
Funny story: my kid used the Smartphone Microscope Adapter Built-In 16X Eyepiece to film a ‘science commercial’ for our living room. Not exactly rigorous, but it got them excited about microscopy. Recommend for engagement value alone 😄
Love that! Engagement is half the battle in homeschool science. Adapters that let kids document their finds are fantastic motivators.
Short and sweet: the 58-Piece Kids Microscope Kit 100X-1200X Metal is amazing value. My 8yo can use it independently and it’s survived drops. Not pro-level optics, but for homeschool projects it’s perfect.
Agree. The metal body makes a big difference vs plastic. For the price, the durability is a win.
This article convinced me to start small. Bought the cheap 58-piece kit to test the waters before upgrading. If it works out, I’ll save up for the High-Power Compound kit mentioned. Fingers crossed!
That’s a smart approach, Omar. Start small, see interest levels, and upgrade later. Happy exploring!
You’ll probably get hooked. The kit is a fun gateway drug for microscopy 😂
Share pics if you find anything cool!
Random: anyone used the High-Power Compound Microscope 100X-2000X STEM Kit to look at pond diatoms? The magnification sounds great but I’m curious about clarity at high power. Also, shipping on some of these Amazon kits can be slow—plan ahead.
Diatoms are a beautiful test subject! High-power kits can show diatom structure if they have good optics and condenser control. But be wary — advertised max magnification doesn’t always equal usable image quality.
We saw neat diatom frustules with a 1000x setup. Clean slides and good lighting matter more than the top number.
Shipping tip: look for sellers with ‘fulfilled by’ status or local pickup if available to avoid delays.
Constructive nitpick: the ‘Affordable Microscope Types’ section could use a quick comparison table (stereo vs compound vs digital) summarizing best uses. People like TL;DR visuals.
Tables are great but also please keep the ‘fun examples’ — those made me actually try the activities.
Great feedback, Victor. A comparison table is a clear way to show trade-offs — we’ll include one in the next edit.
Agreed. Quick bullets helped me decide between stereo and compound when buying for my classroom.
TL;DR: stereo = bugs, compound = cells, digital = show-and-tell 😆
Has anyone tried DIY oil immersion substitutes? 😂 The article’s DIY upgrades sounded super useful. I did the common trick of using vegetable oil on a cheap lens — it improved contrast a bit, but I probably made a mess. #homeschoolhack
Safety note: avoid anything that could damage lens coatings. Check manufacturer recs first.
Lol @homeschoolhack — sometimes those hacks are half the fun though.
Glycerin tip noted! thx 😊
I tried glycerin once — better than veggie oil and less messy. Still, I’d avoid on expensive optics.
Haha, we briefly mentioned DIY but cautioned about true oil immersion requirements for high-power objectives — professional immersion oil has specific refractive index. Vegetable oil can help in a pinch for low-tech experiments, but clean-up is key.
Loved the ‘Bring Tiny Wonders Home’ section — it made a great case for microscopes in a homeschool setting. I especially liked the DIY upgrades bit; we modded a cheap USB scope with a simple LED ring and the kids were thrilled.
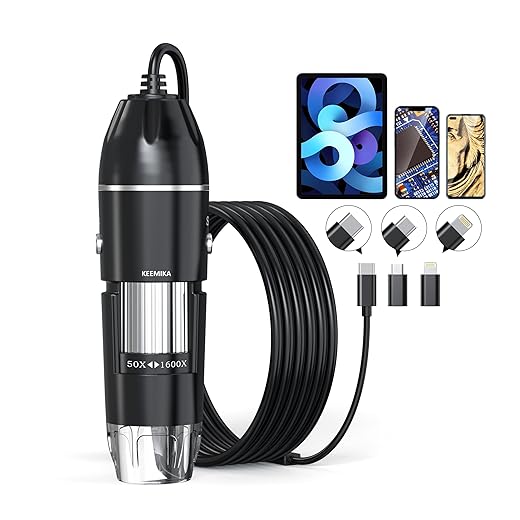
Question: has anyone tried the Handheld USB Digital Microscope 50X-1600X HD Camera for slide work? It seems versatile but I’m worried about stability for little hands.
We’ve used the handheld USB one — clutch for field stuff and rock surfaces, but yeah, for classic slides it’s a bit floppy. A simple phone clamp solved some of our wobble issues.
If you want both, get a cheap stand for the USB camera. I zip-tied one to a lamp stand lol. Not elegant but works.
Glad you enjoyed it, Emily! The USB scopes are great for quick observations and sharing on a tablet, but for consistent slide work I recommend a compound scope — like the High-Power Compound Microscope 100X-2000X STEM Kit — for better stability and fine focusing.
We have the Elikliv LCD Digital Coin Microscope 1000X 4.3-Inch for coin and stamp viewing. It’s fun for little projects and super easy to show a group, but it’s not a replacement for a compound microscope. Still, the screen gets the whole family involved 🙂
We used a coin scope for insect wing pics — kids loved the colors. But for onion cells, nope.
Exactly — digital coin microscopes are fantastic for demonstrations and non-slide objects. The article mentions them as a complementary tool rather than a standalone solution for cell work.
I appreciate the DIY upgrade list but wanted more on budget-friendly slide-making techniques. Like, how to safely get and mount algae, or preserve a flower petal for a week. Anyone have simple recipes?
Pressed flowers between wax paper and a heavy book for a few days works well for plant slides.
Thanks, Mia — we’ll add a mini ‘slide recipes’ section. Quick tips: for temporary mounts, water + cover slip; for longer preservation, use a few drops of glycerin or a simple sugar solution, and seal edges with nail polish for short-term storage.
I use diluted formalin? — jk, don’t do that at home. Glycerin is the safe route. Also silica gel packs help dry plant samples without molding.
I loved the emphasis on sustainability in ‘Start Small, Observe Big.’ Making microscopy a routine part of homeschooling (not a one-off experiment) changed our school year. Small weekly ‘micro-challenges’ kept curiosity alive. Highly recommend the idea!
So glad to hear that approach worked for you, Rachel. Micro-challenges are a great low-pressure way to keep kids observing consistently.
Can you share a few challenge ideas? I’m inspired but short on specifics.
Question for others: are the kids frustrated by swapping between objective lenses on the 58-piece kits? My 6yo finds it fiddly. I’m wondering if we should get a separate stereo microscope for gross stuff and a compound for slides.
You can also label lenses with colored stickers so kids know which to use. Small hacks help.
My 7yo hated swapping too. We set up two stations: one for ‘big stuff’ with the USB scope and one for slides. Rotating stations helps keep attention.
Many younger kids appreciate a stereo scope for 3D objects because it’s more intuitive. If budget allows, a simple stereo for gross specimens + a compound for slides is a great combo.